

Serverless architecture has grown in favour in recent years because to its scalability, cost-efficiency, and decreased operational overhead. In this blog article, we will look at how to create a Node.js application with the Serverless Framework. We'll go over the benefits of serverless architecture and walk you through the process of setting up and deploying a Node.js application on a serverless platform.

There are several popular serverless frameworks available that provide abstractions, tooling, and deployment capabilities for building serverless applications.
Infrastructure as Code: Use a configuration file to define your application's infrastructure.
Simple Deployment: With a single command, you can package and distribute your application.
Event-Driven Architecture: Easily integrate event triggers such as HTTP requests, database updates, and other activities.
Plugin Ecosystem: Extend functionality by utilising a diverse ecosystem of plugins.
Local Development and Testing: For local testing and debugging, emulate the serverless environment.
Cross-Cloud Compatibility: Deploy applications with little changes across various cloud providers.
Community and Support: Take use of an active community, documentation, and the exchange of best practises.
Install Node.js, npm, and the Serverless Framework to get started. Make a project, specify functions and resources in a configuration file, write code, and publish it through the command-line interface. The Serverless Framework's main website has extensive documentation.
Why is Serverless Architecture used? Serverless architecture eliminates the need for developers to manually maintain server infrastructure, allowing them to focus on developing code rather than managing servers. Among the many advantages of serverless architecture are:
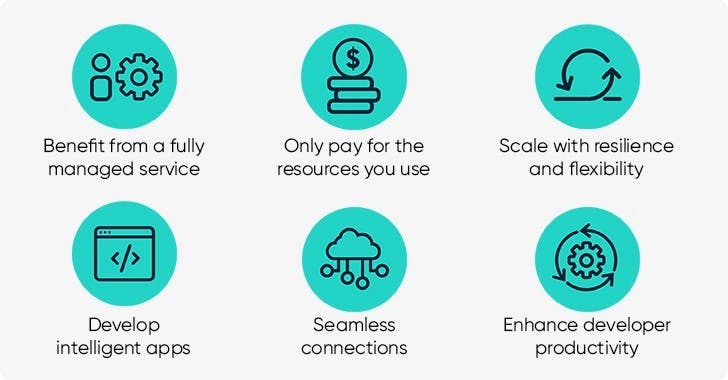
Automatic scaling: Serverless platforms automatically scale your application based on the incoming request volume, ensuring optimal performance and cost-effectiveness.
Pay-per-use pricing: You pay only for the actual usage of your application, rather than paying for idle server time.
Reduced operational complexity: With serverless, you don't need to worry about server provisioning, operating system updates, or scaling configurations. The platform takes care of these tasks for you.
Faster time to market: Serverless enables rapid development and deployment cycles, allowing you to bring your product to market faster.
Setting up the Project: To get started with our Node.js serverless application, follow these steps:
Step 1: Install Node.js and npm: Make sure you have Node.js and npm installed on your machine. You can download and install them from the official Node.js website (nodejs.org).
Step 2: Install the Serverless Framework: Install the Serverless Framework globally by running the following command in your terminal
npm install -g serverless
Step 3: Create a new Serverless project: Create a new directory for your project and navigate to it. Then, initialize a new Serverless project using the following command:
serverless create --template aws-nodejs --path my-serverless-app
This command initializes a new Serverless project using the AWS Node.js template and creates a directory named my-serverless-app with the project files.

Step 4: Set up AWS credentials: To deploy your serverless application to AWS, you need to set up your AWS credentials. You can either configure the AWS CLI or set environment variables with your AWS access key and secret access key.
Developing the Application: Now that your project is set up, you can start developing your Node.js application. The entry point of your application is the handler.js file, which contains the event handlers for different AWS Lambda functions.
You can define your Lambda functions in the serverless.yml file, which is the configuration file for your Serverless project. This file allows you to define the AWS resources, such as Lambda functions, API Gateway endpoints, and DynamoDB tables.
app: new-nodejs-application
org: sushrutnet
service: Updated-serverless-todo-app
#These lines specify the name of the application, organization, and service.
provider:
  name: aws
  runtime: nodejs14.x
  region: us-east-1
  iam:
    role:
      statements:
        - Effect: Allow
          Action:
            - dynamodb:*
          Resource:
            - arn:aws:dynamodb:us-east
1:131122418053:table/ToDoApplication
#The provider section specifies the AWS provider details. It indicates that AWS will be used as the cloud provider, the desired Node.js runtime version is 14.x, and the region is set to us-east-1. The iam configuration allows the Lambda function to perform actions on DynamoDB by defining an IAM role with permissions to perform all actions (dynamodb:*) on the specified DynamoDB table.

functions:
  hello:
    handler: src/hello.handler
    events:
      - httpApi:
          path: /
          method: get
  createTodo:
    handler: src/createTodo.handler
    events:
      - httpApi:
          path: /todo
          method: post
  getTodo:
    handler: src/getTodo.handler
    events:
      - httpApi:
          path: /todo
          method: get
  deleteTodo:
    handler: src/deleteTodo.handler
    events:
      - httpApi:
          path: /todo/{id}
          method: delete
   UpdateTodo:
    handler: src/updateTodo.handler
    events:
      - httpApi:
          path: /todo/{id}
          method: update
#The functions section defines the Lambda functions and their corresponding event triggers. In this case, four functions are defined: hello, createTodo, getTodo, and deleteTodo. Each function specifies its handler file, which is located in the src directory, and the associated HTTP API event trigger with the specified path and HTTP method.

resources:
  Resources:
    TodoList:
      Type: AWS::DynamoDB::Table
      Properties:
        TableName: TodoList
        BillingMode: PAY_PER_REQUEST
        AttributeDefinitions:
          - AttributeName: id
            AttributeType: S
        KeySchema:
          - AttributeName: id
            KeyType: HASH
#The resources section allows defining AWS resources that are not managed by the Serverless Framework. In this case, a DynamoDB table named TodoList is defined with the specified properties, including the table name, billing mode (PAY_PER_REQUEST), and the definition of the id attribute as the hash key.
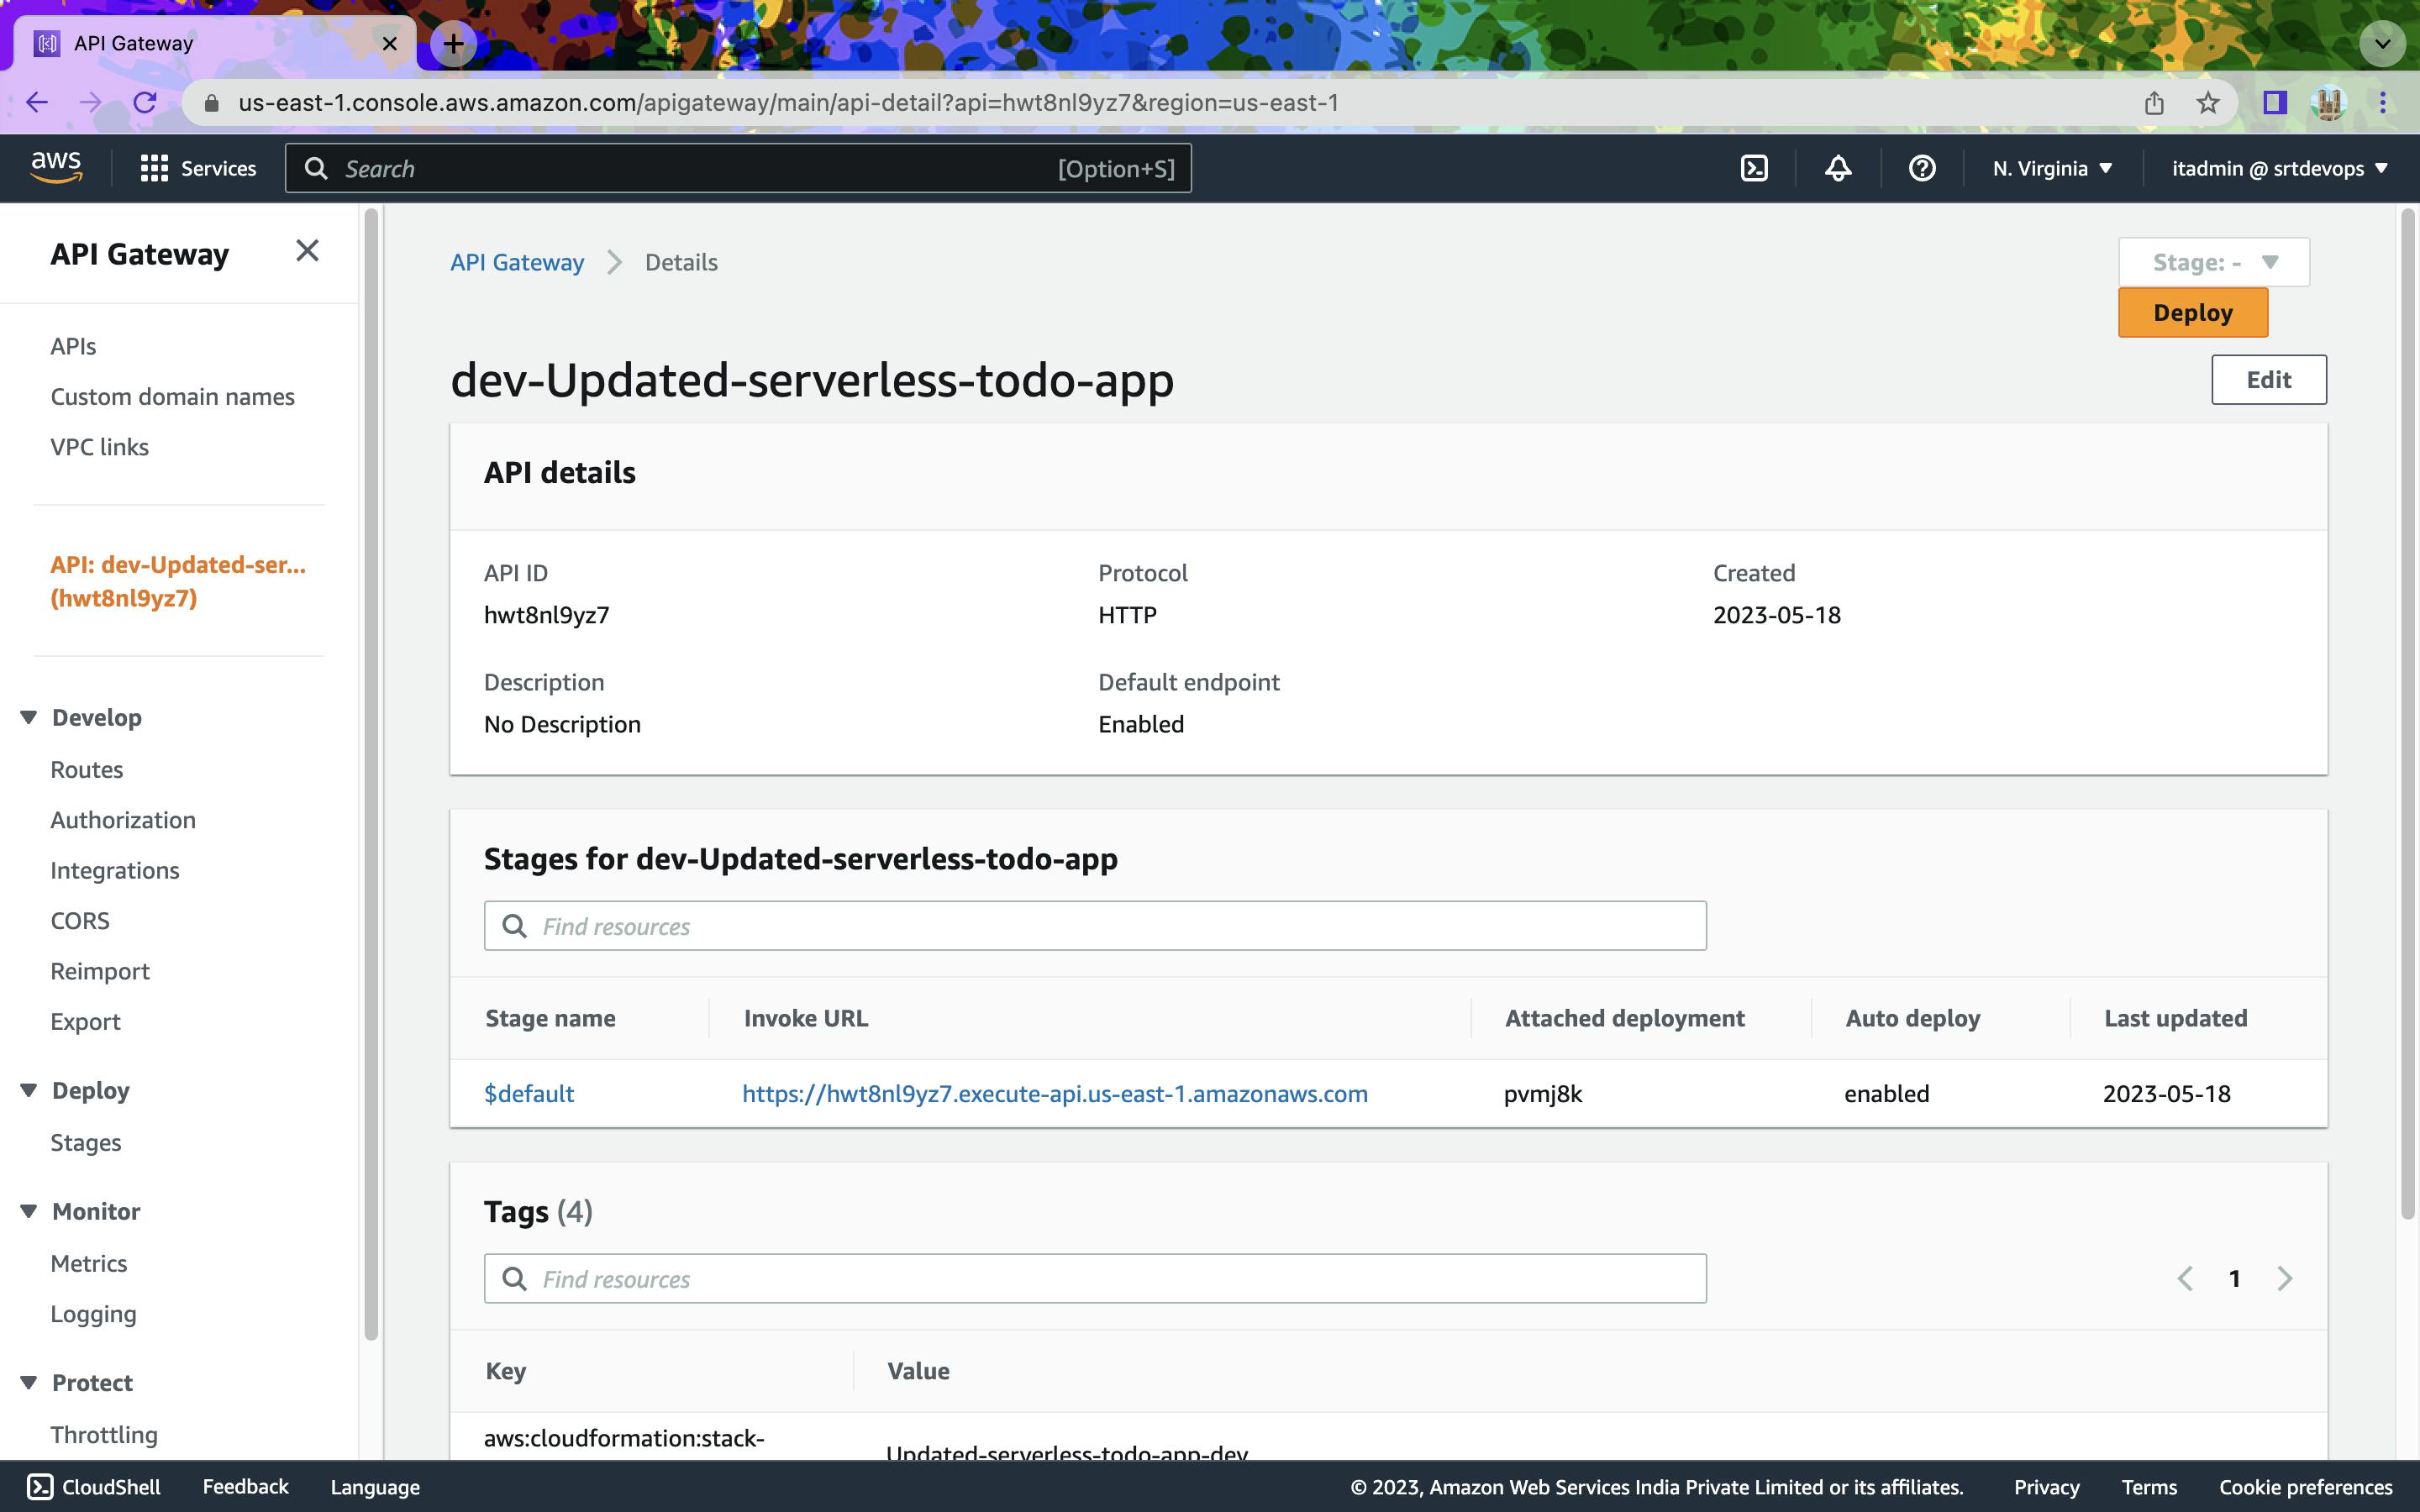
Deploying the Application: To deploy your Node.js application to the serverless platform, follow these steps:
Step 1: Navigate to your project directory:
Copy codecd my-serverless-app
Step 2: Deploy the application:
serverless deploy --verbose
#
This command packages your application code, creates the necessary AWS resources, and deploys the application to the serverless platform.
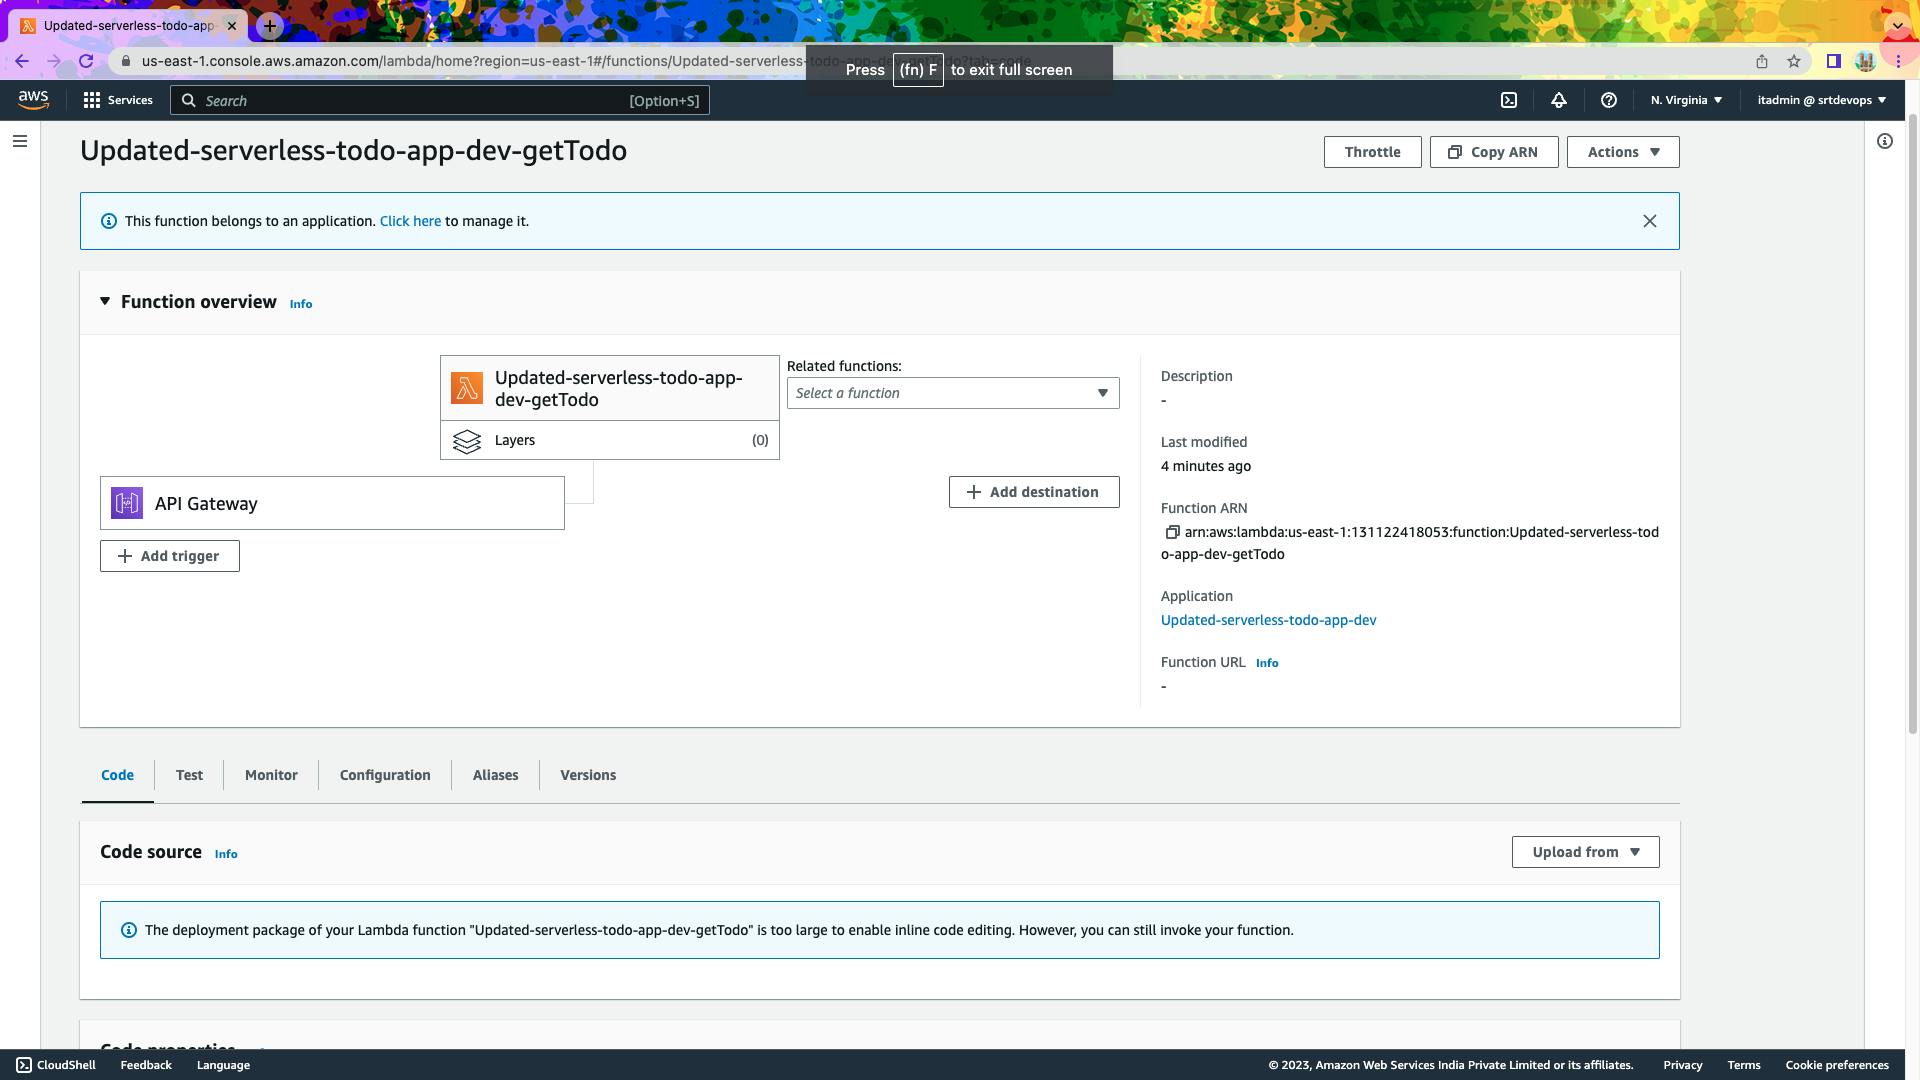
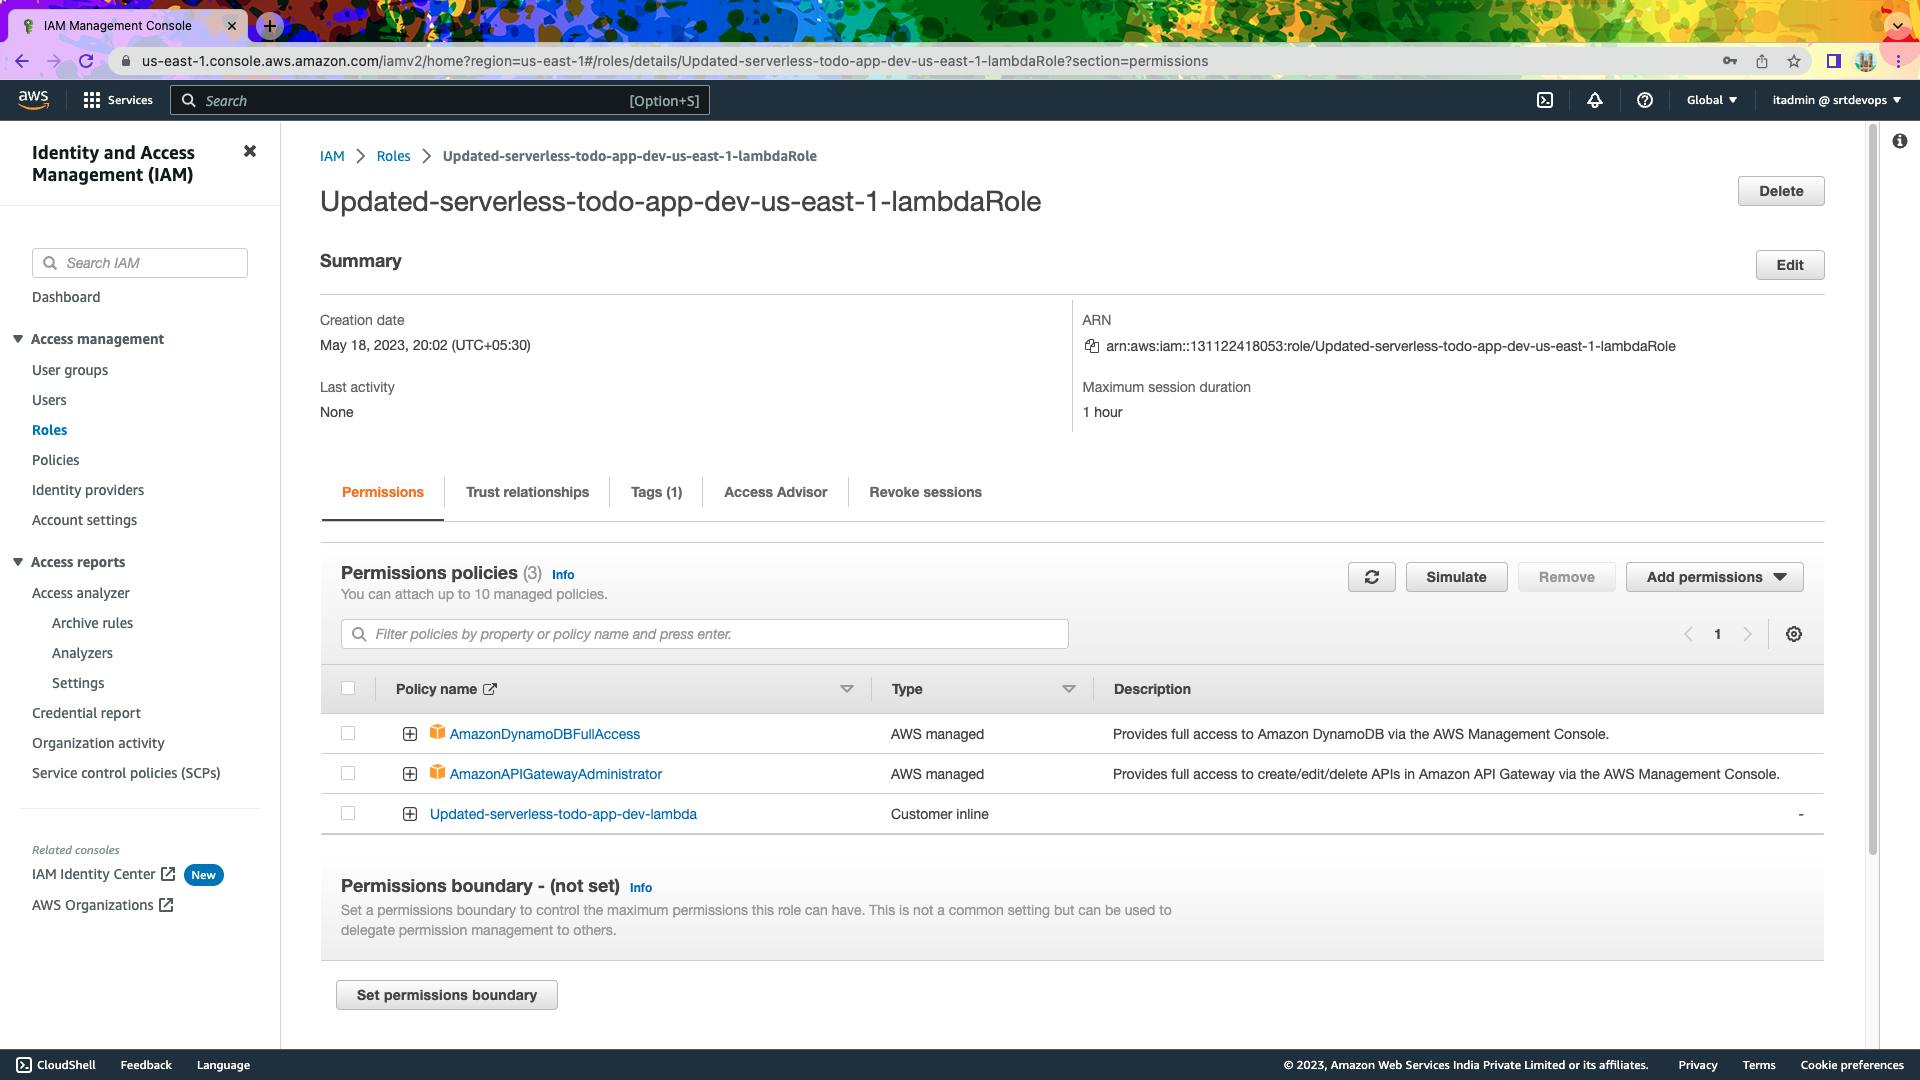
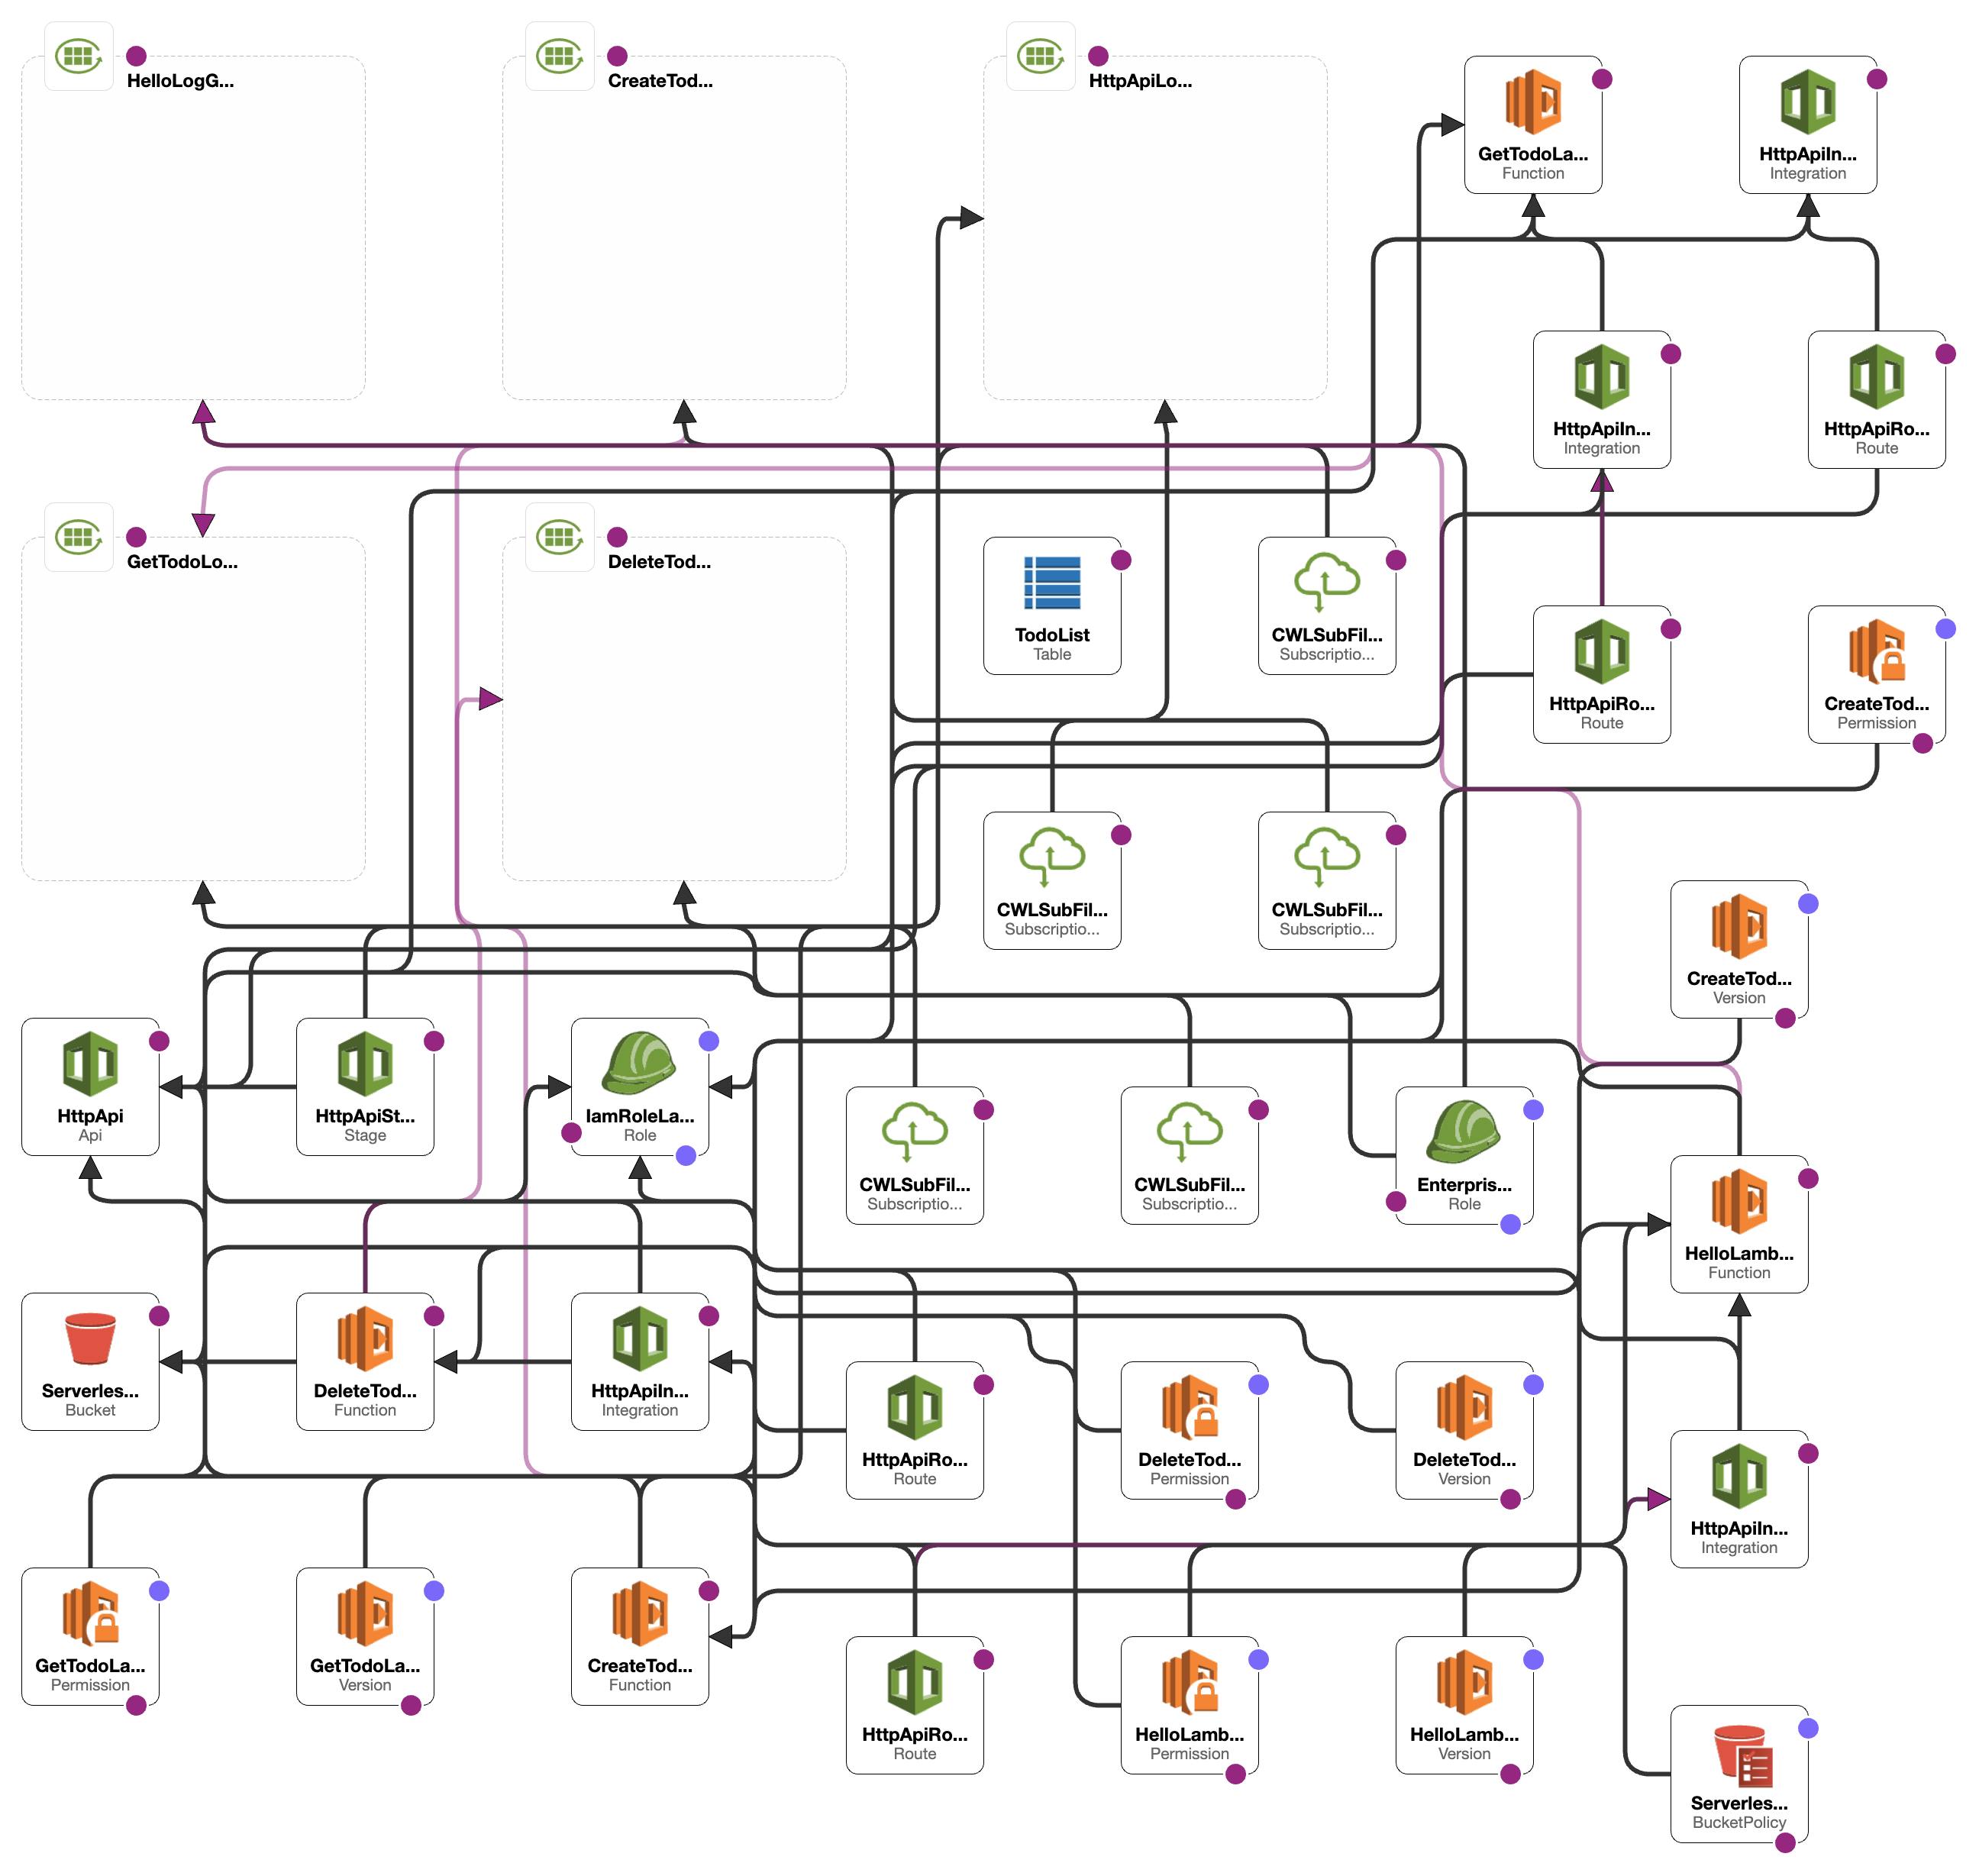
After deploying the application using the provided serverless.yml file, the following AWS services will be provisioned and configured:

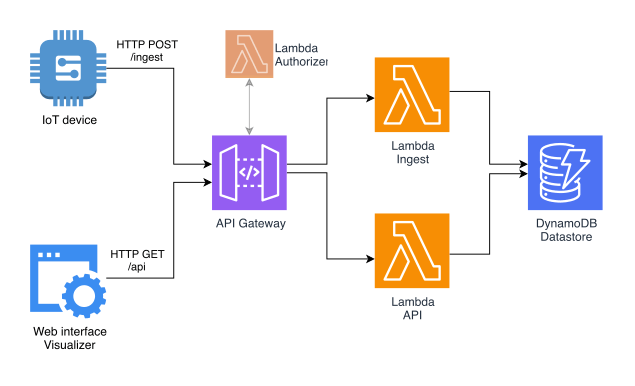
- AWS Lambda: The Lambda functions defined in the
functionssection (hello,createTodo,getTodo,deleteTodo) will be created. These functions will handle the corresponding API events triggered by API Gateway.
AWS Lambda is an Amazon Web Services (AWS) serverless computing service. AWS Lambda is utilised in the context of the project to execute the business logic for the todo application.
Each Lambda function created in the Serverless Framework setup represents a specific todo application operation, such as generating, retrieving, or removing a todo item. These methods are linked to certain API events, which are triggered by API Gateway when an HTTP request to the respective API endpoint is performed.
When an API event occurs, AWS Lambda automatically provisioned the compute resources required and executed the code provided in the Lambda function. The code is commonly written in JavaScript or Node.js and may access other AWS services as well as execute any necessary computations or data manipulations.
AWS Lambda provides various advantages for serverless applications. It enables developers to concentrate on building code without having to worry about server provisioning or scaling. The service scales up or down automatically based on the incoming request load, assuring optimal performance and cost-effectiveness. It also has logging and monitoring tools built in, making it easy to trace and troubleshoot application behaviour.
AWS Lambda functions manage the creation, retrieval, and deletion of todo items in the context of the todo application by communicating with DynamoDB, the database service. They process incoming HTTP requests, extract important information, conduct actions on todo items, and deliver the appropriate response.
- API Gateway: API Gateway will be set up as an HTTP API with the specified routes (
/,/todo) and associated methods (GET,POST,DELETE). API Gateway acts as the front-end for your application, routing the incoming requests to the corresponding Lambda functions.
- AWS IAM: An IAM role will be created with the necessary permissions to allow the Lambda functions to interact with other AWS services. The IAM role will have permissions to perform DynamoDB operations (
dynamodb:*) on the specified DynamoDB table.

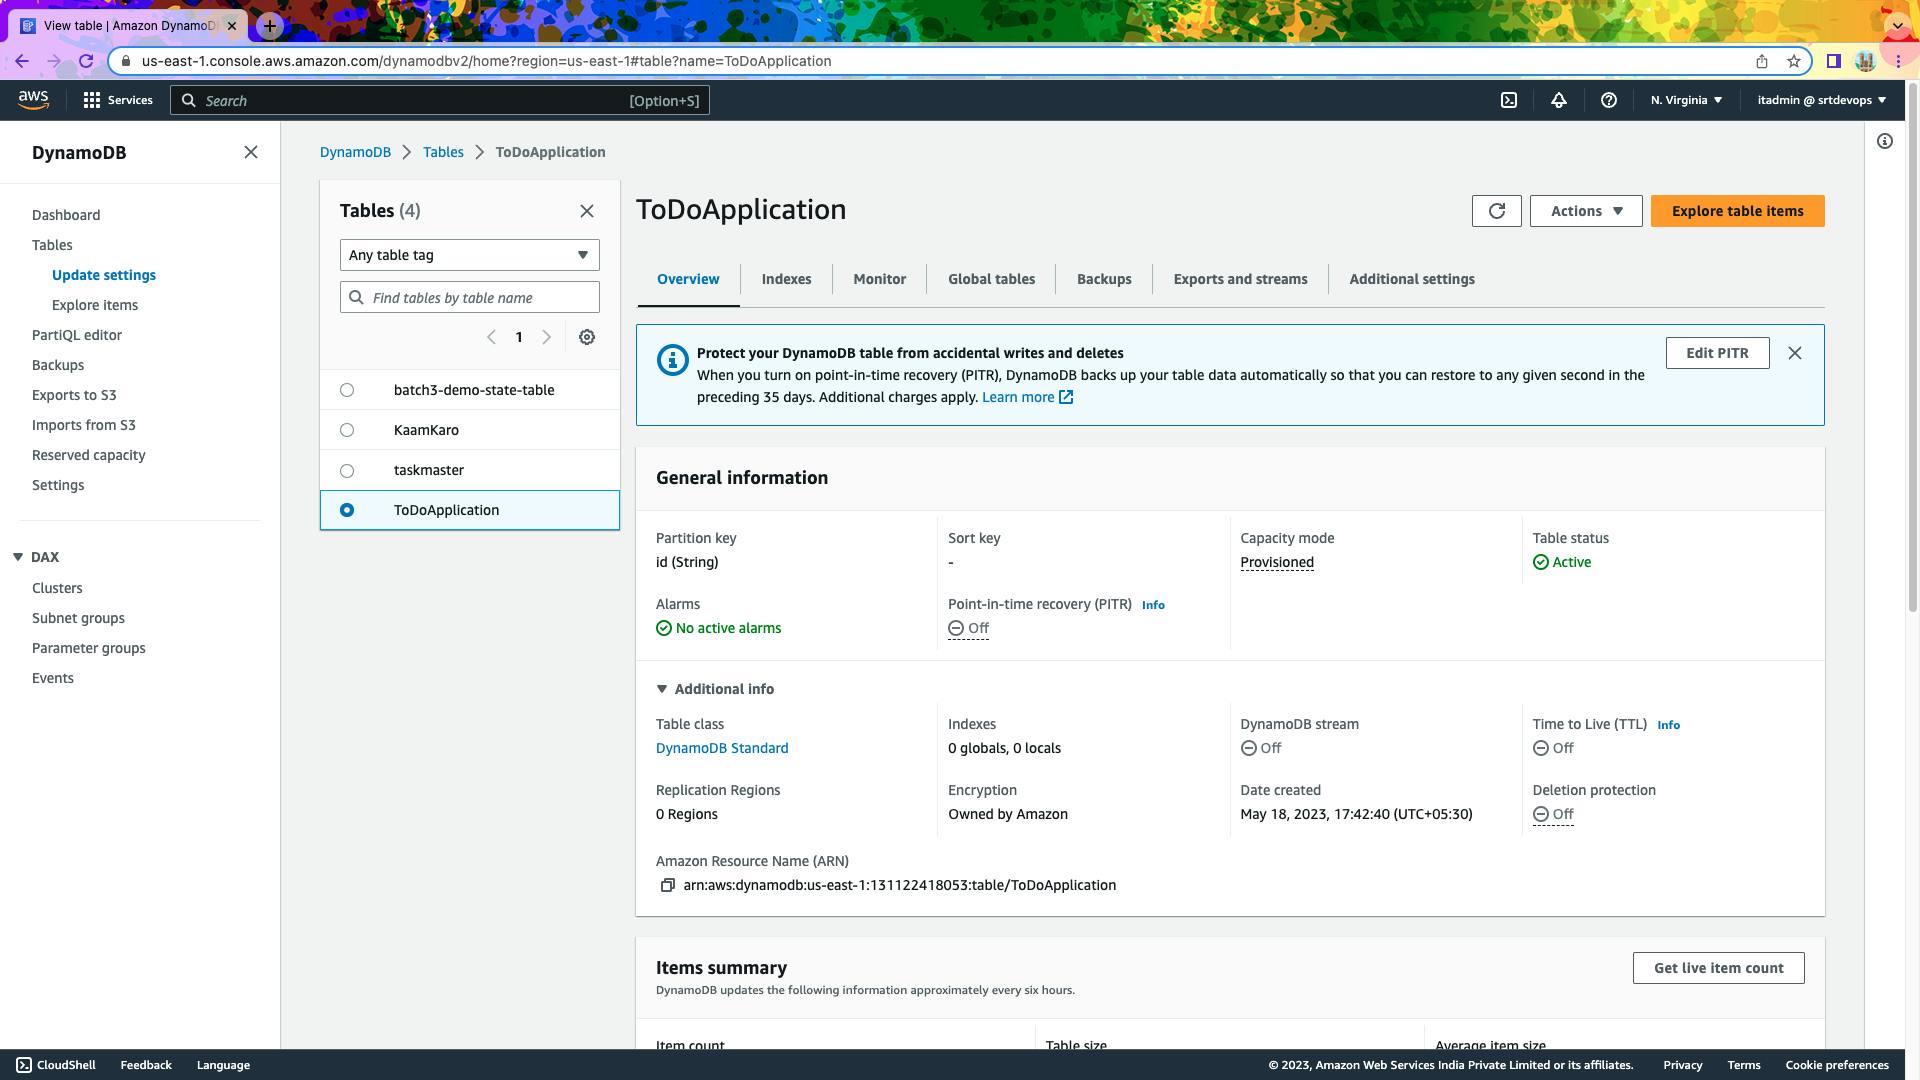
- AWS DynamoDB: The DynamoDB table named
TodoListwill be created with the specified properties, including the table name, billing mode (PAY_PER_REQUEST), and the definition of theidattribute as the hash key. This table will store the ToDoApplication items.
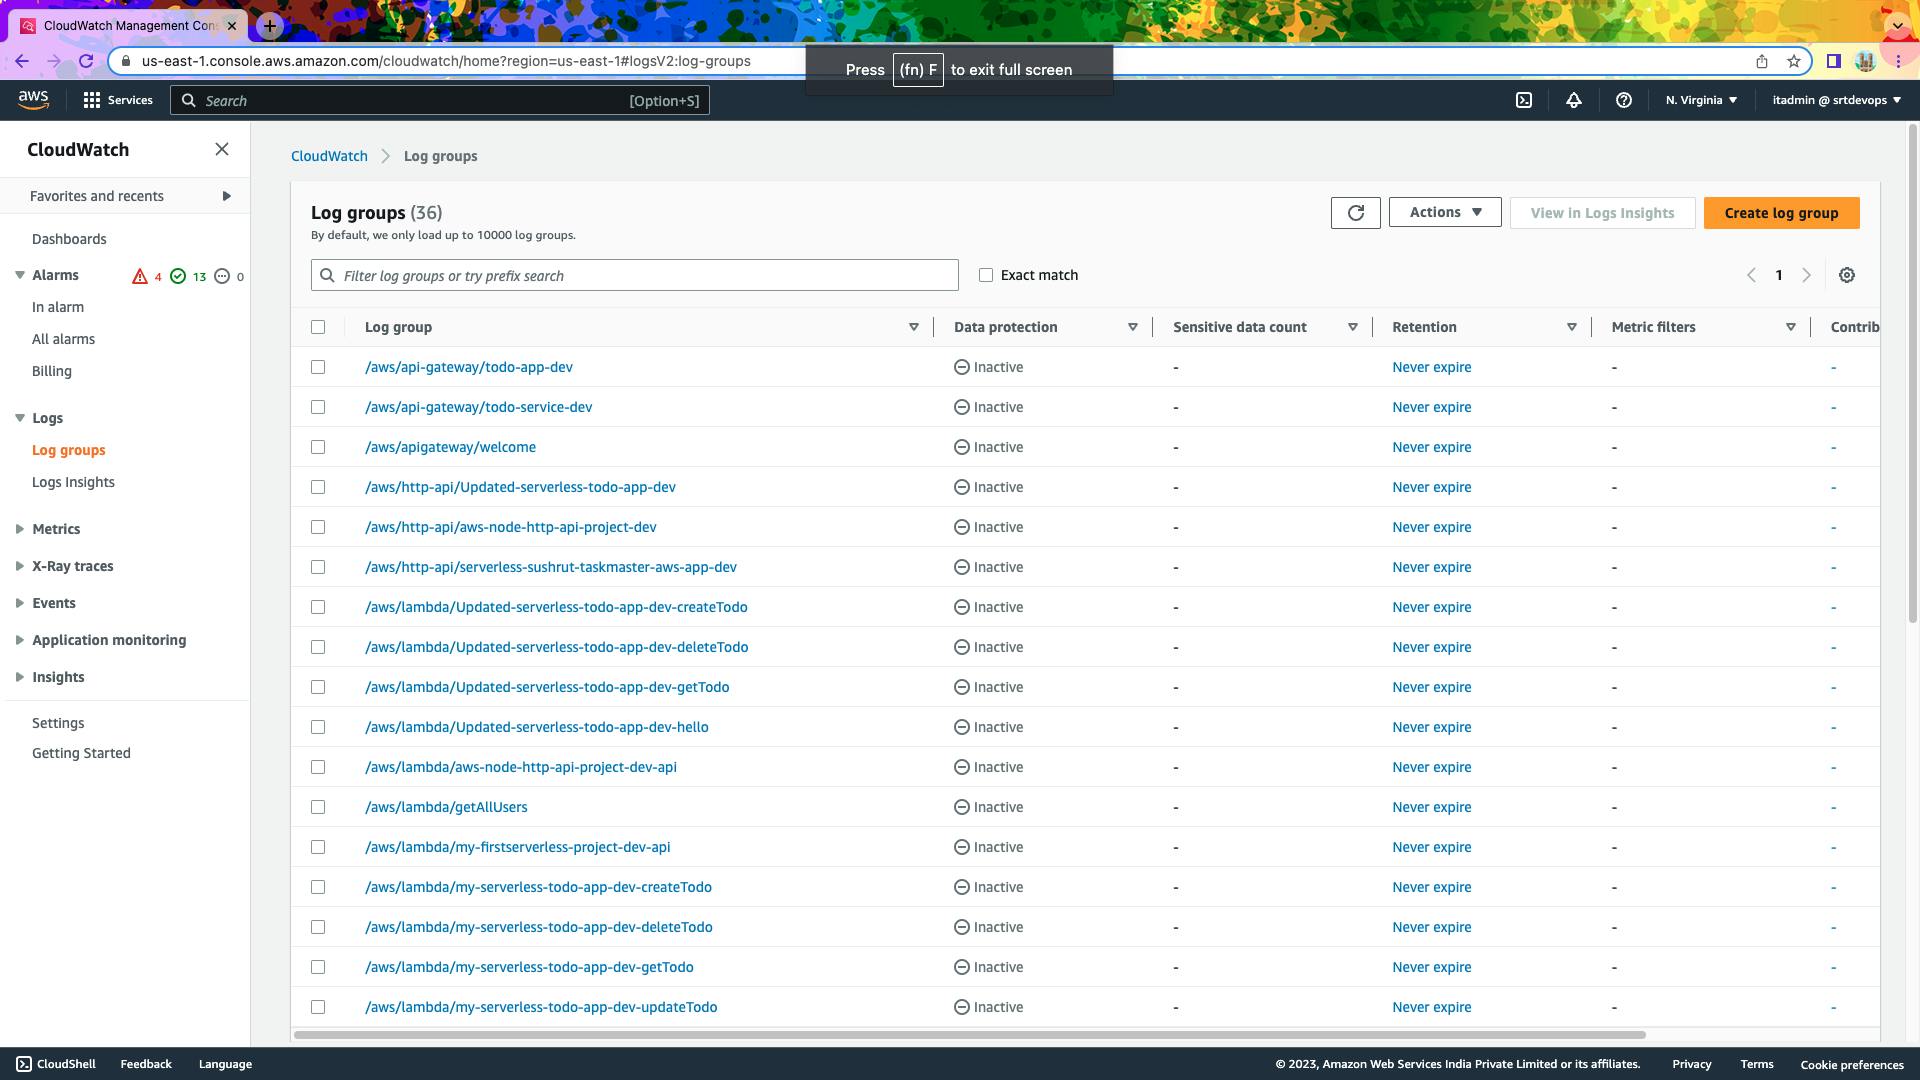
Monitoring and Logging: Depending on your configuration, CloudWatch Logs may be enabled for your Lambda functions, providing detailed logging of function execution. You can also set up CloudWatch Alarms or other monitoring solutions to track the performance and health of your application.

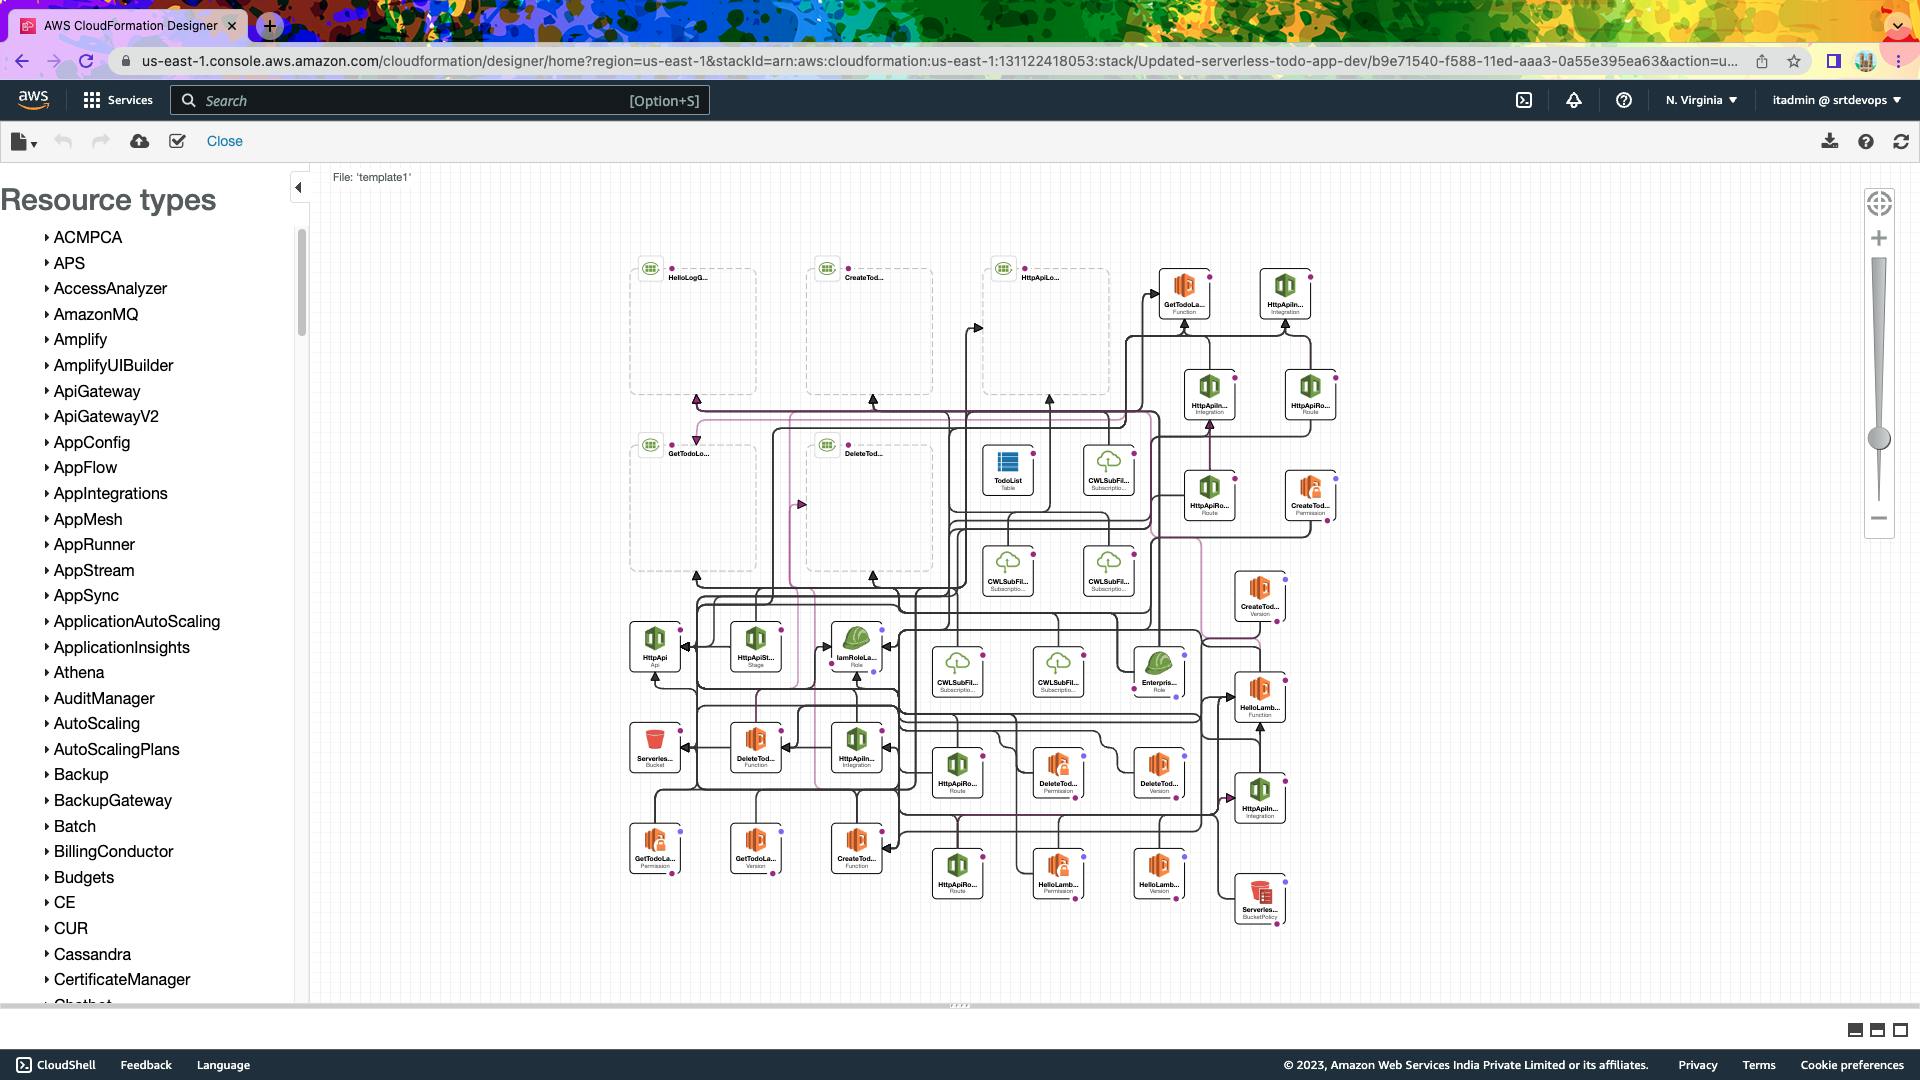
When you deploy your application using the Serverless Framework, it generates a CloudFormation template based on the configuration in the serverless.yml file. This CloudFormation template describes the desired state of your application's AWS infrastructure.
For More Details Read My Blog On CloudFormation:
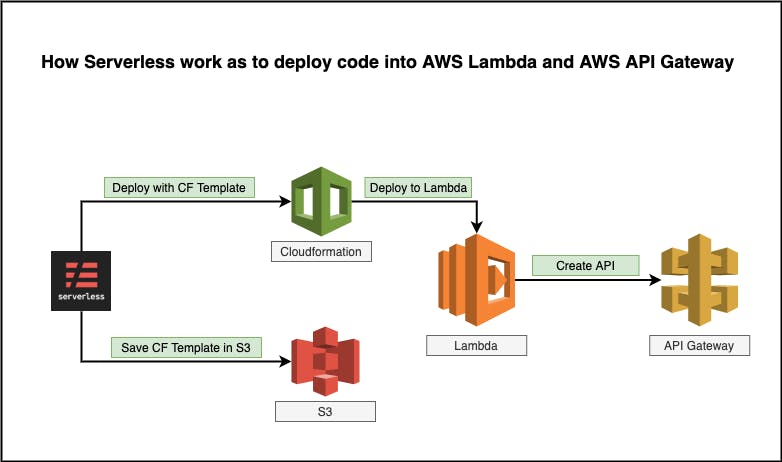
The Serverless Framework then deploys this CloudFormation template to AWS CloudFormation, which takes care of provisioning and managing the specified AWS resources. CloudFormation handles resource creation, updates, and deletion in a consistent and controlled manner, ensuring that your application's infrastructure is in the desired state.
Using Postman to Interact with Your Deployed API.

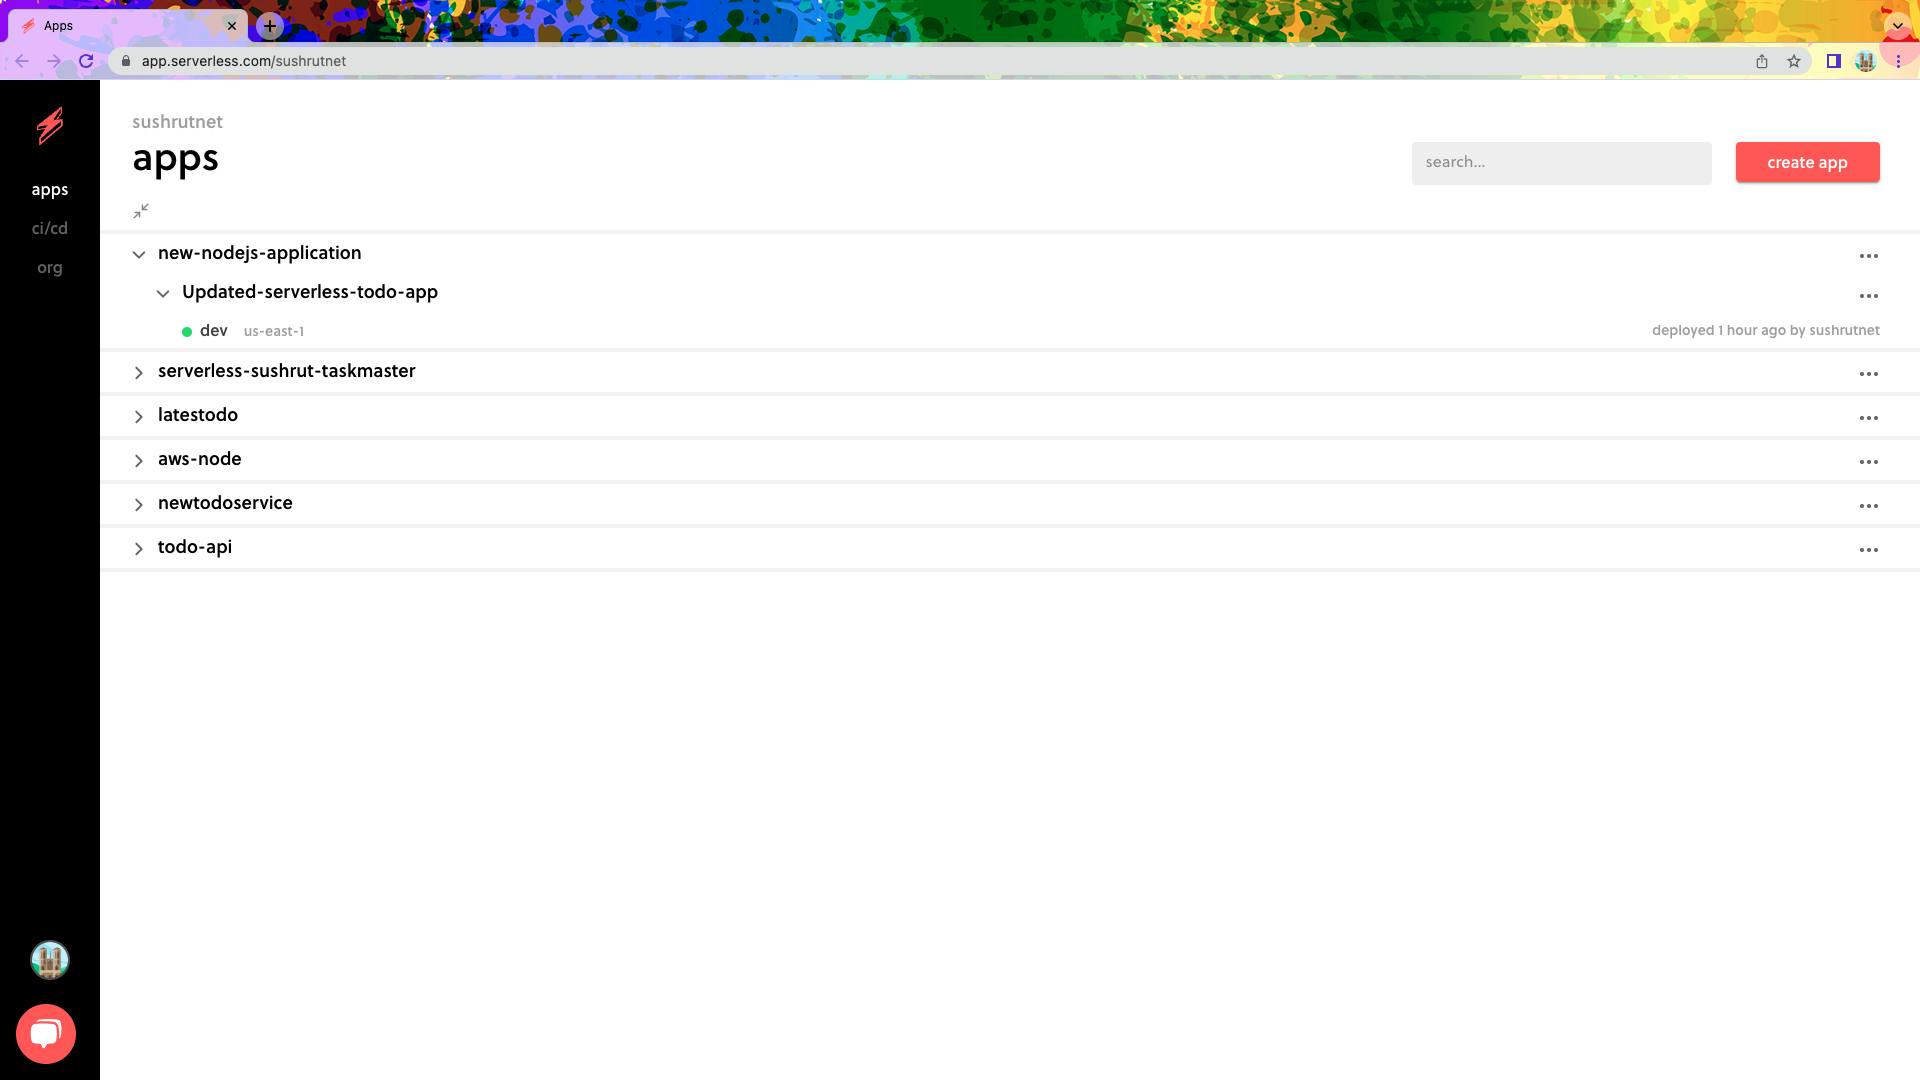
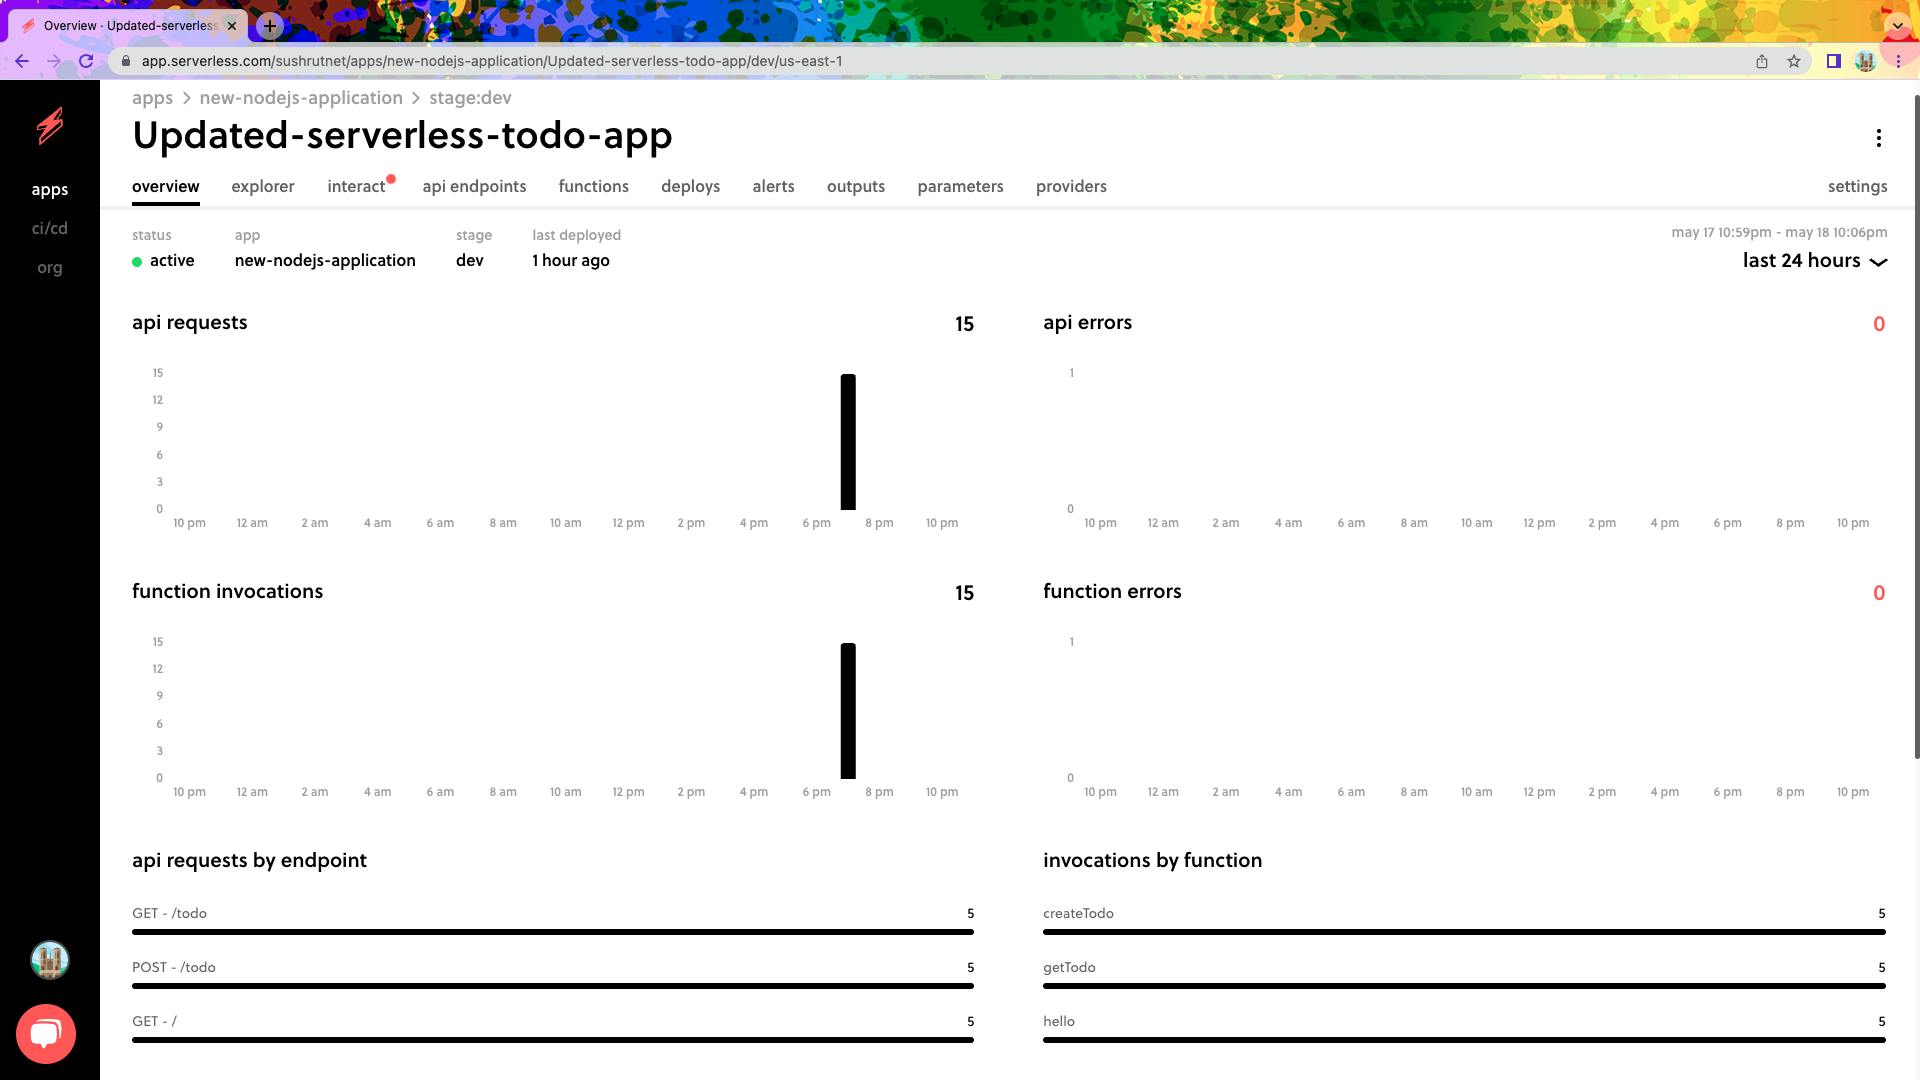
Serverless Framework Dashboard.
Overall, the project proves the use of serverless architecture in the development of scalable and cost-effective systems. It demonstrates how to easily design and deploy serverless apps using AWS services and the Serverless Framework.